Thursday, September 30, 2010

Patrones #295

Patrones No. 295 has arrived in my mail box! 

This is the early Autumn edition and if you are wanting to make a tailored jacket, this is the Patrones to get - there are 14 jackets on offer.    The Aussie summer is on its way so I won't be contemplating any suit making for a while, but there are other goodies.

I currently subscribe to Patrones through ModeInfo but I'm going to have to find an alternative source.  ModeInfo has been excellent but I just had a letter from them advising that next year's subscription will be Euro 231, which is E100 or so more than  last year.  Wow! As much as I love Patrones, that would make them rather too pricey and and I've seen on a couple of boards that there are cheaper alternatives.

Manequim hasn't turned up yet.  They sent me an email late in July saying that I would start to receive the mags in 2 months, so hopefully my first is winging its way here.     

Now, back to Patrones. 
My favourite - this gorgeous blouse.  From the pattern pics it looks like the trim is thin bias strips of the fabric. 
And this coat is lovely.
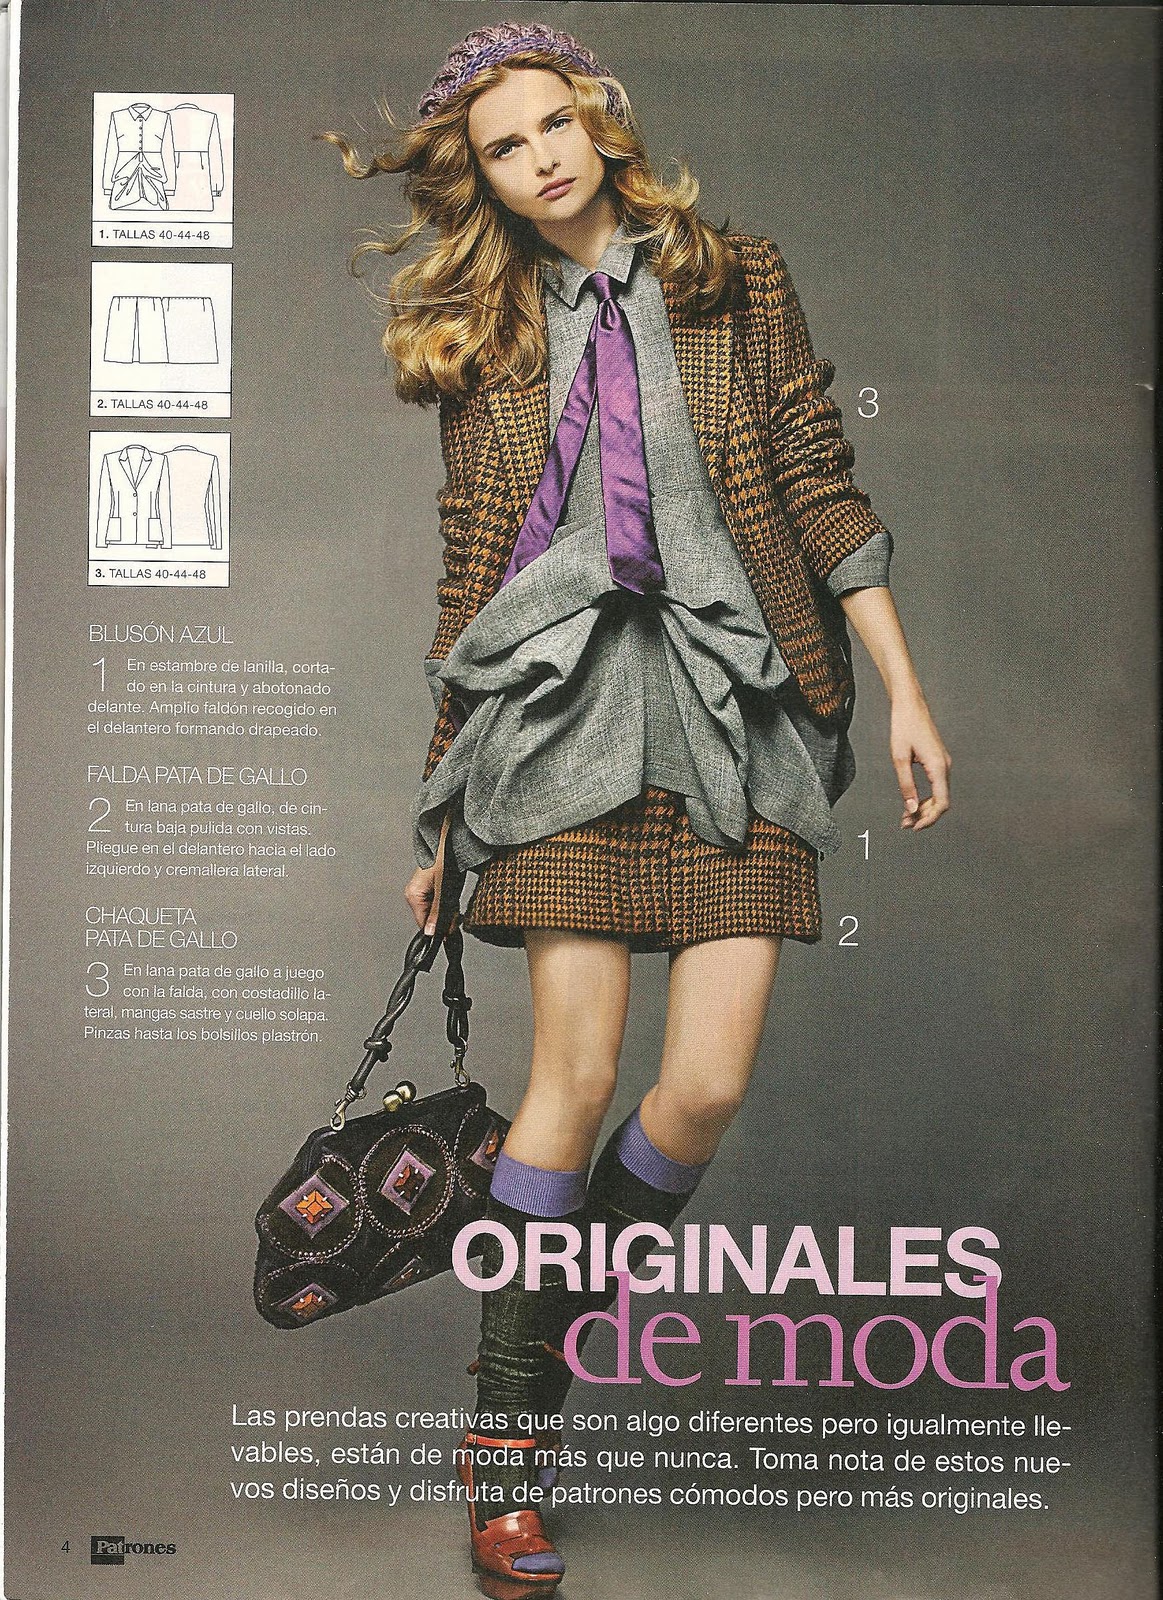
And this has potential although I'd maybe leave off the stripes as it makes me think - 1980s!
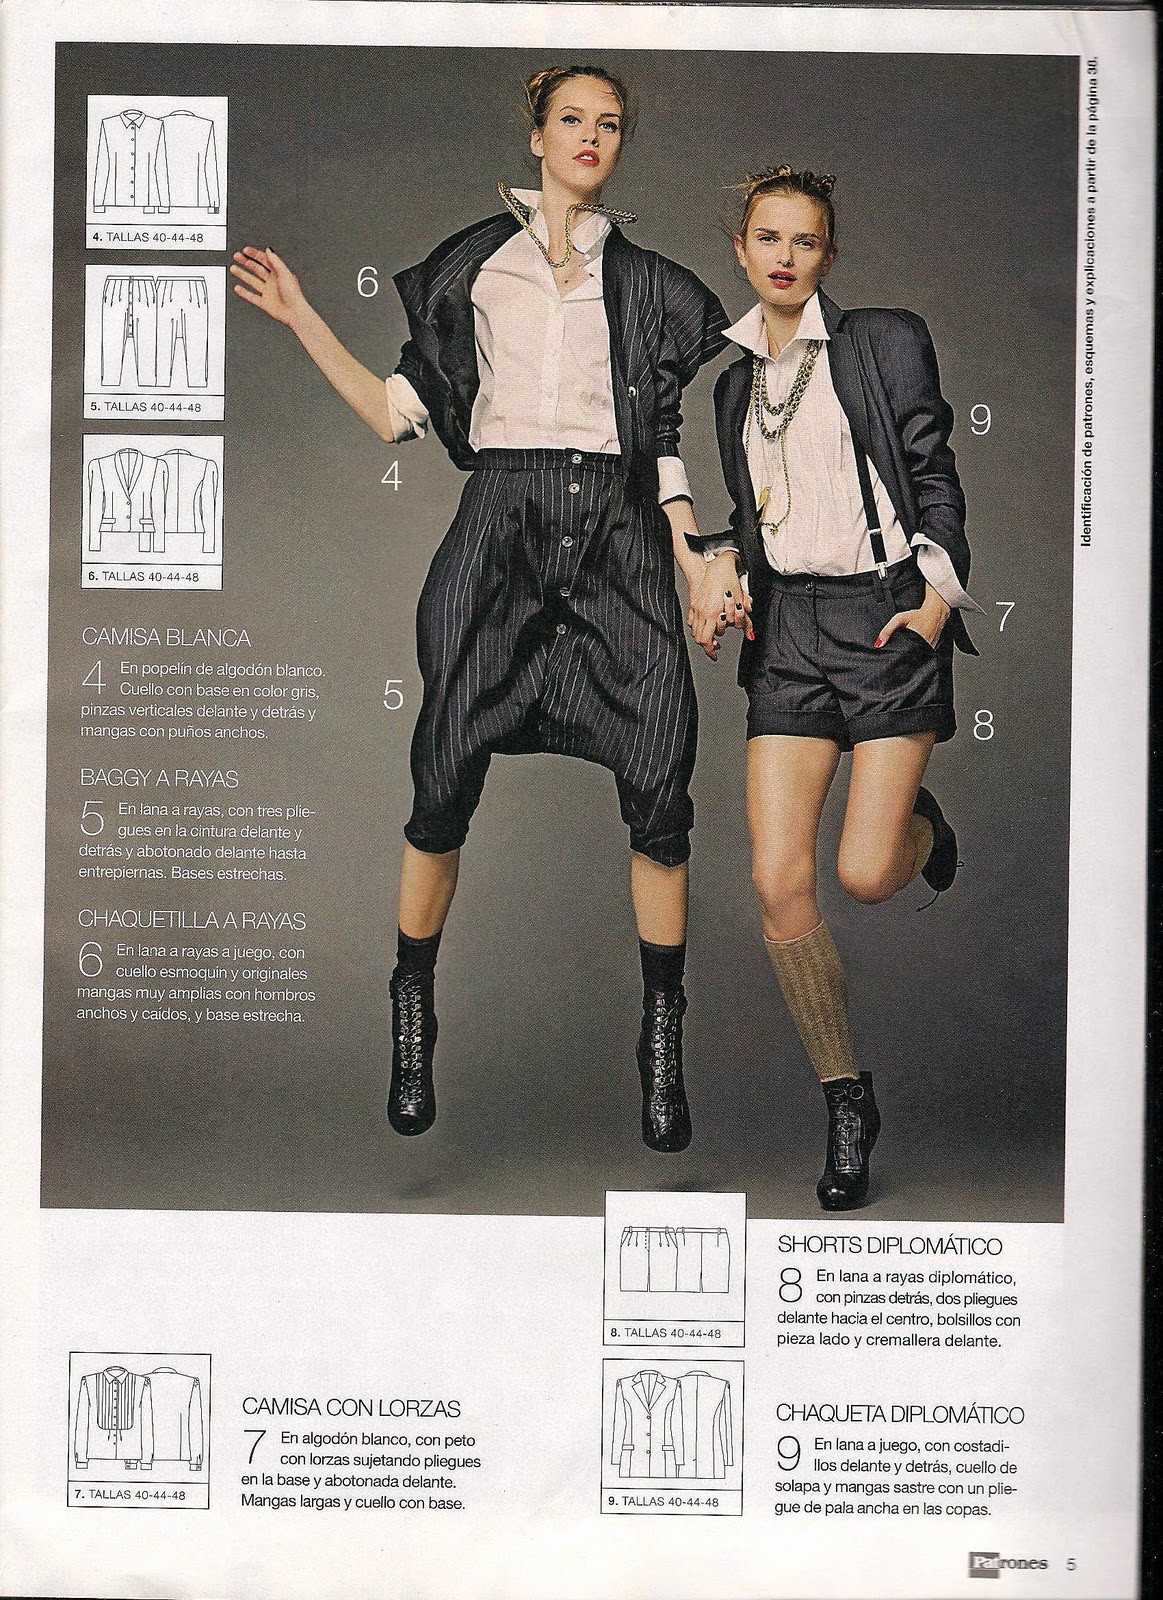
There are also a couple of OTT ones.   The sarouel pants in the photo below look really uncomfortable.  Is this trend a myth?  There are loads more of these pants in magazines than I have ever seen worn in real life.  I have seen maybe a handful, on young tall girls in tshirting fabric and they look very cool on them, but that is about it.  
 And I quite like this top, but not sure how easy it would be to wear.
It looks like there may be 2 Patrones next month - with an additional Plus size issue. 

Thursday, September 23, 2010

Vogue 1191 - Part V - the end

For the last 3 weeks my car has been at the mechanics.  They haven't been able to work out what is wrong with it, but just as I started this post I got a call from them.   They have discovered that the problem is .... mice!   A nest was found way up inside the car and the mice had eaten their way through the covering on the electrical wires.     Mice!!!!!   Who would think!

Unfortunately, the result of this is extremely costly.   Those are very high maintenance mice!  Oh dear... have to think about that after Melbourne.  Don't want to put a crimp in my fabric shopping plans.

Now, back to the dress.  Have you had the experience of the muslin going together beautifully and the actual garment being a pain?  This is one of those.  
Step 20 of the Vogue instructions requires you to sew the centre back seam. 

Step 21 requires you to now pin / baste the skirt to the bodice.    Note that you aren't twisting the skirt like a twist top, you are just pulling the centre-back (which is hanging in front in the photo above) across to where it belongs at the back, and that creates the twisty effect.
Inside out the back will now look like this.
Right side out the front looks like this.  
Step 22 - 23 make the inside waist facing. 
Step 24 pin the facing to the basted waist seam and stitch.  The instructions make this look oh so clean and easy - I had really thick messy layers of fabric in the front, particularly through the pleated section.  
Trim and turn down facing.   Then tack it to front and back seams to keep in place.

Easy peasy from now on.  Sleeves - I did 2cm seams as they were a bit loose - tapering to 1.5cm at the underarm.  
And hem.   I used a twin needle for all the hems.

The final tidy up - as I had a bigger gap in the front than I think I should have (which I mentioned in the earlier post - to do with Step 8), I catchstitched the top of the pleats to the bottom of the cross pleat. You can't see it when it is on.


The messy stitching is my machine basting - all of that was removed at the end.

So, finally - the dress!  Looks lovely on the dressform doesn't it?
The black version, on me.    
Oh, I loved this until I saw the photos of it on me!  It's alright but it does look much more glam on the dressform doesn't it?  It looks more pedestrian on me.  I can kind of see why Vogue doesn't recommend this for rectangular body shapes - it creates a bit of a bulbous effect round the middle, given the pleating.     
 
I would love to hear others' experiences with this pattern.  It has some of the most confusing instructions I've come across in a while, or is that just me?
 
Off to Melbourne tomorrow and all those lovely fabric shops......

Monday, September 20, 2010

Vogue 1191 Part IV Construction

The weather is so nice in Perth at the moment, I've been feeling all energetic and wanting to be out and about rather than in the sewing room.  Spring has arrived! But I have set today aside to finish this dress.  Off to Melbourne in a couple of days.  
So, I'm up to the last paragraph of Step 6 of the instructions for Vogue 1191.   This is where I started getting confused with the pattern diagrams.  
 
Neckline

I always have to raise necklines but this one was particularly low. Raising the neckline is easy but the method isn't initially obvious.  The top of the marking below that looks like a dart is the neckline point.  To raise the neckline, just extend the line up to where you want it.   
Now reinforce stitch to and from the closest circles, and up to the new neckline point.
I got particularly confused by Pattern Step 7.   Ummmmmmmmm..........?   
What they mean is sandwich the right side of the bodice pieces together, matching the lines in red and then stitch along those lines.
And slash.
When you hold the pieces up, magically you have something resembling a bodice. 
Step 8 - BEWARE. I think I made a mistake in my reading of this.  Be careful about the circles they are referring to.  The pattern says:
I turned under the bit between the clips in the middle, so it looked like this.  I'm not certain but I think that may be WRONG.  When I went to sew on the skirt I had a bigger gap than I should have.  
Next up - the back, and if you don't want to insert a zip ignore pattern steps 10 to 18.    Instead sandwich right sides of back and back facing together and sew neck edge.
Turn and understitch back neck facing - that is my preference to stop the neckline rolling out and showing the facing.
The next step is a bit difficult to show but open out shoulder seams of the front and of the back and sew the front to the back at shoulders. 
So, it ends up looking like this right side out. 
Next sew side seams of front and back facings and front and back bodice. 
Right side out the dress will look like this on the dressform. Pin and baste around the bottom of the bodice and sleeves. 

You are then up to Step 19 and have finished with the bodice and are attaching the skirt. Final steps next post.

Friday, September 17, 2010

Vogue 1191 Part III Construction

The green Vogue 1191 dress is progressing... slowly.   

There are only 4 pattern pieces and yet this is marked as 'Advanced'.  The sewing techniques are standard for a knit dress, but working out how to put this together is the challenge and some of the instructions are head scratchers.
I've taken photos of all the steps in case it helps anyone else attempting this.   My construction is a bit different than the pattern as I left out the zip and raised the neckline.

Transferring all the pattern markings is key (my preference - sewing carbon paper and a tracing wheel).
There are a fair few pleats and darts to contend with.
I''m using wooly nylon thread in the sewing machine bobbin.   I sewed the skirt centre front seam first (rather than at pattern step 3) - it was easier to visualise what is what and which side of the jersey is the right side.

Pattern Step 1 has you reinforce here and clip.

 Step 2 has you turn in the upper part and edgestitch it. 
Step 4 - machine baste the waist pleats.
Step 5 -stitch the waist darts.
Press them all flat.
 
Step 6 -sew the shoulder pleats and press them.
 
Sew the waist dart in the facing and then trim it and press.
Next post - how to raise the neckline and the final part of step 6 onwards.   Otherwise this is going to be a loooooooong post....

Tuesday, September 14, 2010

Free Patterns! New Burda Easy Fashion and Lekala

Oh I do love freebie patterns!   And suddenly there are multitudes of them!  

BURDA EASY FASHION

The German Burda Website has some cute new Easy Fashion patterns, which seem to be from its Autumn/Winter 2010 mag.   While it looks like quite a few,  I think there are actually only 2 patterns and instructions - one trouser and one tee, with lots of variations.  
Other Easy Fashion patterns on the Site are free and simple to download.  However, for the new ones, Burda requires you to input a download code.  I can't believe how much time I spent trying to work out what the Code was!  All the site says is:
Comments on the Site by other frustrated patternistas suggest that they were having the same problem. 

About to give up, I typed in the code in the Burda diagram (i.e. UYPBBxv9Ws) and it worked!   DUH!!!! I had assumed that the code there was an example, not THE code!   Obviously I wasn't the only one to be be bamboozled so I don't feel ENTIRELY stupid.

The instructions come in heaps of languages - but not English.  There are many clear pictures of the steps though, and they are very simple styles. 
My favourite - version B with Padded/quilted shoulders - but are those built in mittens???   
And these - love the version with sequined mesh under gashes. 
And more....
 
 LEKALA PATTERNS

And even better - as mentioned on Fehr Trade and then Pattern Review, a Russian pattern company, Lekala, has an amazing freebie.  All of its women's patterns in a size 42 or 44 (Burda sizes) are available for download during September - for nothing!  That is 86 pages of patterns!  In addition, some of the patterns where you put in your measurements and it spits out a personally sized pattern, are also free. 

What a great offer! I haven't tried sewing any of their patterns before but I am really keen to try. There is a huge range to choose from - there are so many fabulous styles, I keep finding more I want to download, but my faves so far are these.
Happy downloading!